How To Clean Battery Terminals: A Step-by-Step Guide [2025]
Corrosion buildup on the terminals can restrict the flow of electricity, causing slow starts, dim lights, or even complete power failure. Cleaning them not only improves performance but also extends the lifespan of your battery.
For vehicle owners wondering how to clean battery terminals in a car, the process is simple yet effective. First, ensure the engine is off and the keys are removed. Disconnect the negative cable before the positive, then use a mixture of baking soda and water with a stiff brush to scrub away corrosion. After rinsing and drying, reconnect the cables, starting with the positive terminal. Regular maintenance like this ensures a strong and reliable electrical connection every time you start your engine.
Let’s dive into the nitty-gritty of keeping those battery terminals shiny and functional. Picture this: you’re all set, coffee in hand, ready to hit the road, but your car decides it’s not the morning for moving. Pop the hood, and what do you see?
A winter wonderland on your battery terminals – except this snow is the kind you don’t want to touch. That’s corrosion, folks, and it’s a sneaky thief of power. But fear not, I’ve got the steps to tackle this crusty culprit and keep your battery running like a champ.
First things first, understanding what you’re up against is crucial. Battery corrosion isn’t just a sign you’re destined to be late; it’s a wake-up call from your car. Ignoring this can lead to a symphony of automotive woes, with your car refusing to start being the opening act.
So, let’s roll up our sleeves and get to cleaning because, trust me, keeping those terminals clean could be the difference between a smooth ride and a roadside headache.
Remember, a clean battery terminal means a happy car and an even happier you. Plus, it’s not rocket science; with a few simple tools and a little elbow grease, you’ll be back on the road in no time. So let’s gear up and show that battery corrosion who’s boss.
Understanding Battery Corrosion and Its Causes
Battery corrosion usually appears as a white, green, or bluish powder around the terminals, caused by chemical reactions between the battery acid and the metal connectors. This buildup can reduce electrical conductivity, leading to starting problems and poor performance.
For those wondering how to clean battery terminals at home, the process starts with safety—always wear gloves and eye protection. Corrosion can stem from overcharging, leaking electrolyte, or simply the age of the battery. By recognizing these causes early, you can clean the terminals effectively and prevent future buildup, ensuring your battery remains in top condition for longer.

So, what’s the deal with battery corrosion? It’s like the uninvited party guest that just loves to wreak havoc. Most of the time, this corrosion is a fashion statement no battery should make, sporting colors from snowy white to greenish-blue hues. It’s all about the battery acid meeting the air and having a little too much fun at the expense of your connection.
But here’s where it gets interesting. You might think it’s all the battery acid’s fault, but it’s actually a tag-team effort. The acid’s just chilling there, minding its own business, mixed with water. When things get charged up or used, the mix gets more acidic or more watery, leading to a party on the terminals we’re not invited to. Add some electricity, and you’ve got yourself a chemical reaction. That’s why when we bring baking soda to the mix, it’s like breaking up the party before it gets out of control.
What is Battery Corrosion?
Battery corrosion is like that annoying rust but for your battery terminals. It’s what happens when the battery acid decides to go on a little adventure outside the battery. This corrosion usually shows up as a white, crusty substance that’s got a fashion sense of its own, sometimes turning shades of blue or green when it feels fancy. Think of it as the battery’s way of crying for help.
This corrosion is not just about looks; it’s a saboteur that disrupts the connection between your battery and the terminals, making it harder for your car to start or electronics to function properly. It’s like having a bad cell signal; no matter how loud you shout, the message doesn’t get through. And nobody wants to be left shouting at a car that won’t start.
How Battery Corrosion Affects Your Devices
Imagine you’re all set for a big day, and your trusty gadget suddenly plays dead. That’s battery corrosion doing its dirty work, disrupting the flow like a dam in a river. It’s not picky; from cars to remote controls, if it relies on batteries, corrosion is ready to mess things up. The poor connection means your devices can’t get the juice they need to keep going.
The real kicker? If left unchecked, this corrosion can lead to costly repairs or replacements. It’s like letting a small leak turn into a flood. Suddenly, that little bit of crusty nuisance can cost you more than a few batteries; it can take down entire systems. So, keeping those terminals clean is more than just a chore; it’s a mission to save your electronic companions from an untimely demise.
Preparing to Clean Your Battery Terminals
Corrosion buildup can restrict electrical flow, leading to poor performance or even complete failure to start. Before you begin, gather the right tools—protective gloves, a wrench, a wire brush, and a cleaning solution.
A simple and effective method many people use is to clean battery terminals with baking soda. By mixing baking soda with water, you create a gentle yet powerful cleaner that neutralizes acid and loosens corrosion. Always make sure to disconnect the battery cables—negative first, then positive—before cleaning, to ensure safety and prevent sparks. Preparing properly sets the stage for an efficient and damage-free cleaning process.

Alright, so you’ve spotted that crusty menace lurking on your battery terminals. Before we jump into the ring with our cleaning supplies, let’s get our ducks in a row. Cleaning battery terminals isn’t a walk in the park, but it ain’t a trek through the wilderness, either. Just a bit of preparation and you’re set to take on the corrosion monster and kick it to the curb.
Safety First: What You Need to Know
Now, hold your horses before diving into the cleaning spree. Safety is the name of the game when dealing with battery corrosion. This stuff isn’t just messy; it can be downright hazardous. Gloves and goggles aren’t just a fashion statement here; they’re your best buds in keeping those hands and eyes safe from harm.
And let’s not forget, we’re dealing with chemicals that don’t play nice. Baking soda and water might sound like a science fair project, but combined, they’re your golden ticket to neutralizing battery acid. Just remember, adding water to acid is like inviting a bull to a china shop; always add acid to water if you’re mixing stronger solutions to avoid a not-so-fun surprise.
Gathering the Necessary Materials
Alright, it’s tool time. But before visions of power tools dance in your head, let me break it to you: cleaning battery terminals is a low-tech affair. You’ll need some basic supplies that are probably already lying around your garage. Think baking soda, water, a toothbrush or small brush, and some elbow grease. Simple, right?
For Car Batteries
When tackling car batteries, the plot thickens a bit. You’ll need the same basic supplies, but let’s add a few upgrades. A wire brush steps up the game for getting rid of the tough crust, and some petroleum jelly to finish off with a protective coat. It’s like giving your battery terminals a spa day; they come out clean and get a layer of protection to keep them from aging too fast.
And don’t forget, disconnecting the battery is key. You’re not trying to light up like a Christmas tree, so make sure that car is off and those terminals are disconnected before you start your cleaning expedition. Safety first, folks. Now, let’s get those terminals shining like new.
For Household Batteries
Alright, tackling household batteries doesn’t require you to gear up like you’re entering a science lab. You’ll need a few simple items: vinegar or lemon juice, a little baking soda, cotton swabs, and an old toothbrush. Why? They’re fantastic for munching away that nasty corrosion that seems to pop up out of nowhere. Plus, they’re probably sitting in your kitchen already, begging to be useful. So, grab ’em and let’s get to work.
Don’t overlook safety, though. You might think, “It’s just a AA battery; what’s the worst that can happen?” But hey, those chemicals are no pie filling. Wear gloves, maybe some safety goggles if you’re feeling extra cautious, and keep your workspace well-ventilated. We’re cleaning, not creating a DIY disaster.
The Cleaning Process Explained
Over time, corrosion and dirt can build up on the terminals, restricting the flow of electricity and causing starting issues or reduced efficiency. The process is simple but requires the right tools and safety precautions.
For example, if you’re wondering how to clean battery terminals in a car, start by disconnecting the negative cable first to prevent short circuits. Then, use a mixture of baking soda and water to gently scrub away corrosion with a brush. Rinse with clean water, dry thoroughly, and reconnect the cables, ensuring a secure fit. This simple routine can significantly improve battery performance and prevent unexpected breakdowns.
Now, the cleaning part is more about elbow grease and less about rocket science. You’ve got your tools, and you’ve got your dirty battery terminals staring back at you. It’s go-time. Baking soda and vinegar or lemon juice act like those superheroes that cut through grime. Mix, apply, scrub, and voila! You’re halfway to battery paradise.
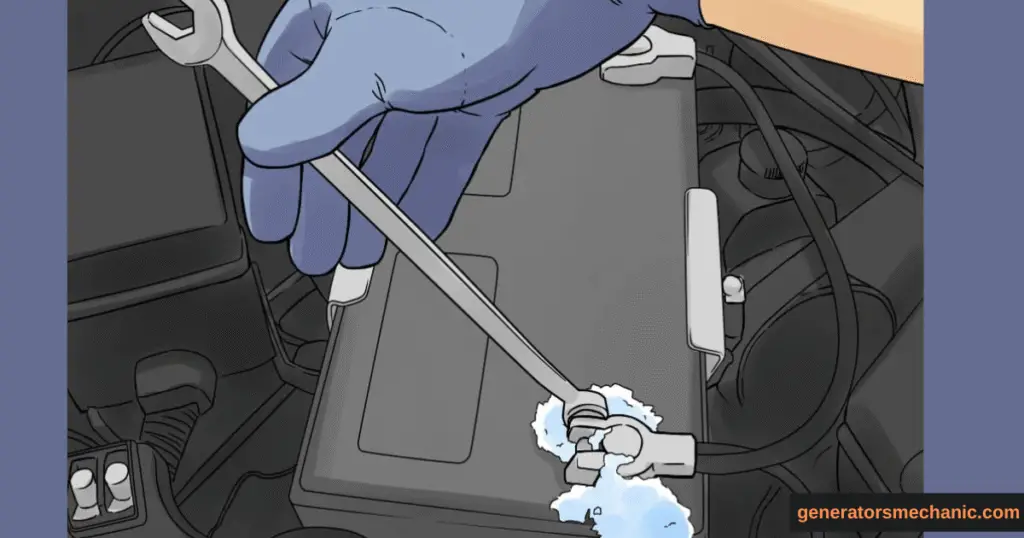
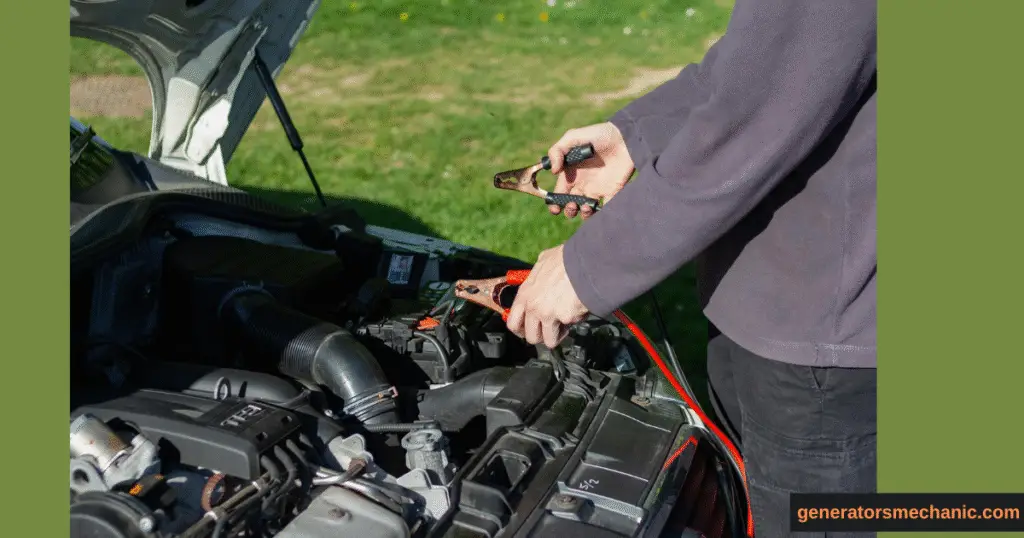
Step 1: Disconnecting Your Battery
Let’s start with the basics. Before you dive into the nitty-gritty of cleaning, you gotta disconnect those batteries. And I mean proper disconnection, no half-measures. Pull them out of your gadgets, remotes, or wherever they’re snugly fitted. This isn’t just about safety; it’s also about getting a good look at what you’re working with.
With your battery freed from its electronic dungeon, you’re ready to assess the situation. Check for any signs of leakage or bulging. If it looks like the battery’s been hitting the gym too hard and is all swollen, skip the cleaning. That battery needs to retire, pronto.
Step 2: Inspecting the Battery and Terminals
Now, shine your detective light on the battery and its terminals. What you’re looking for is battery corrosion, which, funnily enough, tends to announce itself with no subtlety – white, bluish, or even greenish gunk. Nasty stuff. This villainous grime could be the reason your gadget’s acting all moody.
If you see anything suspicious, like leaks or the battery looking more bloated than my Uncle Jerry, don’t even bother cleaning it. That’s a clear sign for a one-way trip to the recycling center. Safety first, always. No cleaning regimen is gonna fix a battery that’s about to pop.
Step 3: Choosing Your Cleaning Agent
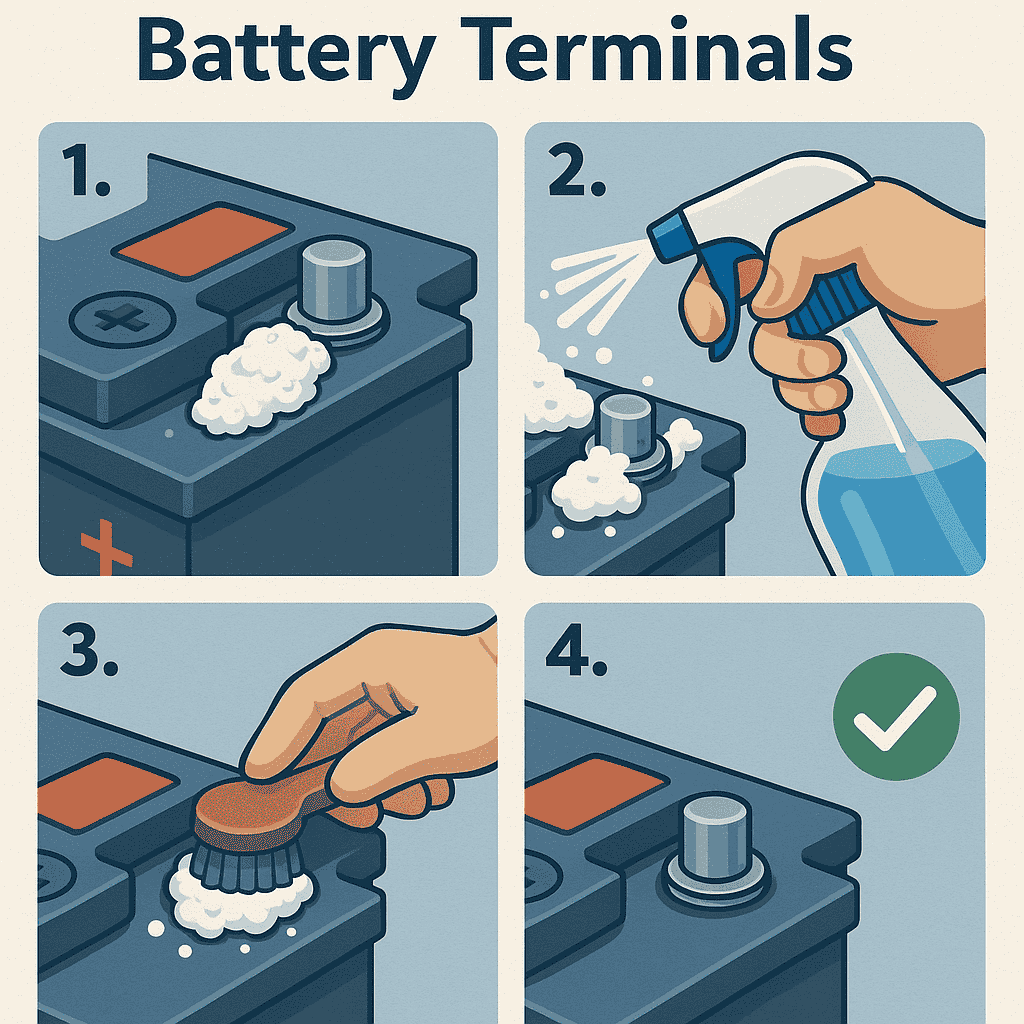
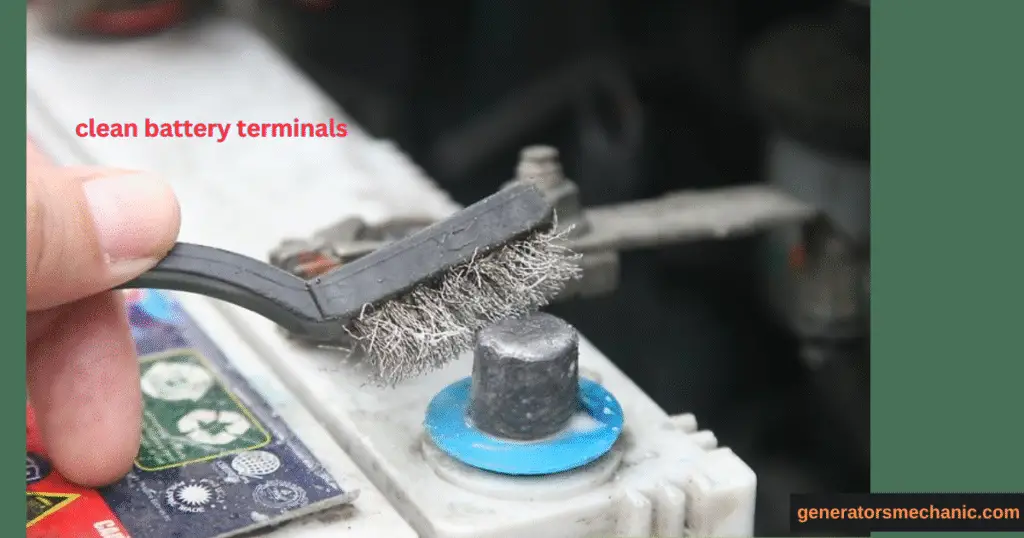
The showdown between corrosion and your chosen cleaner is next. Baking soda is a trusty ally here, mixed with a bit of water to form a paste. Grab an old toothbrush, and you’re equipped for battle. Use that elbow grease, scrubbing away the grime and corrosion, but sparingly – you’re cleaning, not exfoliating.
Using Baking Soda and Water
Baking soda and water, folks, it’s the peanut butter and jelly of cleaning battery terminals. Mix these two, and you’ve got a cleaning paste that’s gentle yet effective. Attack that corrosion with your brush, and don’t be shy. This mix is like the good cop in an interrogation room – it gets the dirt talking.
But remember, patience is key. It might take a little scrubbing before you see results, kinda like convincing a toddler that veggies are tasty. Consistency and a gentle touch will get you there, bringing those terminals back to their shiny glory.
Alternative Cleaning Products
If baking soda’s not your style, there’s more than one way to clean a battery. Enter vinegar or lemon juice – nature’s rust busters. These acids are great for chewing through corrosion, making them a solid choice for your battery woes. Apply with a wire brush or cotton swab, and watch the corrosion wave goodbye.
And like any good alternative rock band, vinegar and lemon juice offer a different yet satisfying flavor. Use them wisely and watch as they bring those grimy, corroded terminals back to life, ensuring your devices stay powered up without a hitch.
Step 4: Applying the Cleaning Solution
With your cleaning solution ready, it’s time for the magic. Apply it directly to those grubby terminals. If you’ve gone the baking soda route, our trusty wire brush will serve you well. For a more delicate touch or tighter spaces, cotton swabs are your knights in shining armor. Gently, now – we’re cleaning, not carving.
Work the solution into the corrosion, using your tools to lift off the build-up. Patience wins the race here; give the cleaner time to do its thing. Corrosion didn’t appear overnight, and it won’t vanish in a second, but with steady strokes, you’ll see it start to fade away.
Step 5: Rinsing and Drying the Battery Terminals
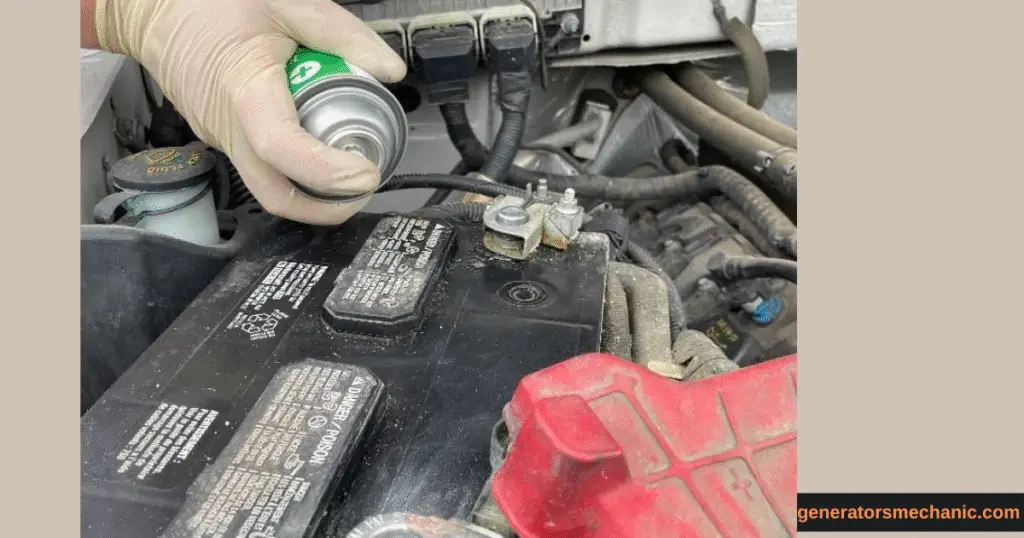
After your cleaning spree, it’s rinse time. But let’s keep it dry – we’re not actually splashing water around. Instead, use a clean, damp cloth to wipe away the residue, followed by a dry cloth to ensure no moisture sticks around. Moisture is the archenemy of battery terminals; we don’t invite archenemies to our party.
Now, here’s the cherry on top: a dab of petroleum jelly on each terminal. This isn’t just for looks; it’s a protective barrier against future corrosion villains. Spread it thin, though – like you’re buttering toast, not making a sandwich. This ensures a strong connection and keeps the terminals smooth and corrosion-free.
Step 6: Preventing Future Corrosion
Alright, so now that all the hard work of cleaning is behind us, let’s keep it that way, huh? The simplest trick in the book to dodge future corrosion is yanking those batteries out if you’re not planning to use the device for a while. It’s like telling your batteries to take a vacation. Also, remember that heat and moisture are like the evil twins for battery health. Keep your devices stored in a place that’s as cool and dry as a comedian’s humor. And using expired batteries is a big no-no, like wearing socks with sandals.
Applying Petroleum Jelly
Now, let’s talk about a slick trick – petroleum jelly. After you’ve done the deed of cleaning the terminals, slathering a thin layer of petroleum jelly can act like a shield against corrosion. Think of it as the superhero cape for your battery terminals. It’s not just good for chapped lips, folks.
This little act of kindness towards your battery can go a long way. It’s like giving your battery terminals a little hug, telling them everything’s gonna be alright. Plus, it makes your next cleaning session a breeze, because who doesn’t like a smooth operator?
Other Preventative Measures
Alongside our friend petroleum jelly, there are a couple of other tricks in the bag to prevent battery terminal corrosion. For starters, every once in a while, give your battery a pep talk and a good inspection to catch any signs of corrosion before they get worse. It’s like checking on a plant to make sure it’s not wilting.
Also, keeping the battery terminals tight and secure is key. A loose connection can invite corrosion like an open invite to a house party. And who likes uninvited guests, right? Regular check-ups and a bit of TLC can keep your battery running smoother than my last attempt at ice skating.
After Cleaning: Reconnecting and Testing
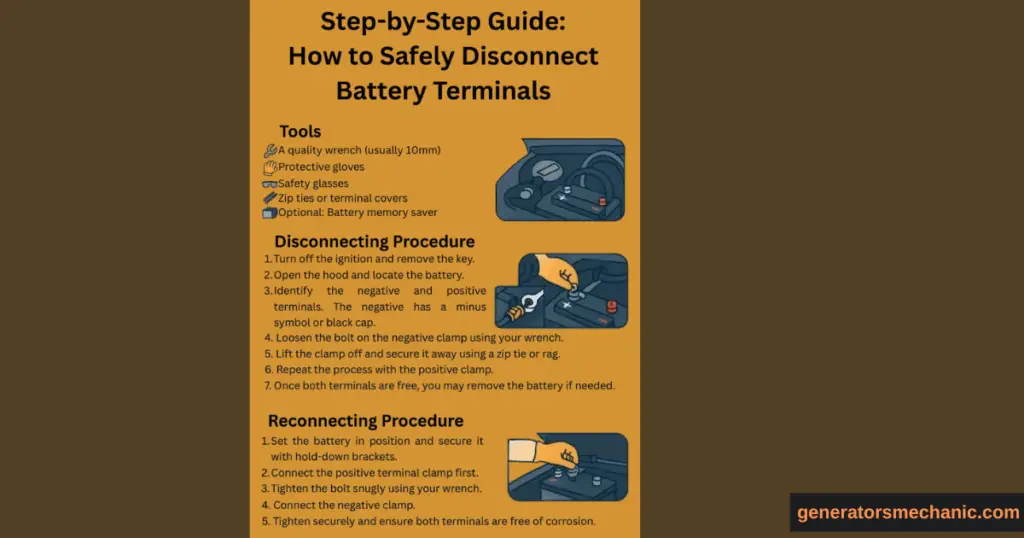
. Always start by attaching the positive cable first, followed by the negative, ensuring both connections are secure and snug. This helps prevent sparks and ensures a stable flow of electricity.
If you’ve followed simple methods like how to clean battery terminals at home, you’ll likely notice improved performance, whether it’s in your car, generator, or other battery-powered devices. After reconnecting, test your battery-powered equipment to confirm that the power supply is steady and everything is functioning as expected. This final step not only ensures safety but also extends the lifespan of your battery.
Alright, so you’ve cleaned and prepped your battery like a boss. Now comes the moment of truth – reconnecting and testing. Start by carefully reconnecting the battery, positive terminal first then the negative. It’s like putting on your shoes; there’s an order that just works best.
Once everything’s connected, give your battery a test run. If it starts without a hitch, you’ve done a stand-up job. It’s like hitting a home run without even breaking a sweat. But remember, if things seem off, it might be time to call in the pros. Because sometimes, we’ve all got to know when to pass the baton.
How to Properly Reconnect Your Battery
Reconnecting your battery isn’t rocket science, but there’s a proper way to do it to avoid a world of headaches. Always hook up the positive terminal first – that’s your red cable. Then, move on to the negative – that’s the black one. This order matters like putting socks on before your shoes. You wouldn’t do it the other way around, would you?
Make sure everything is snug and secure, but not like you’re trying to crush a walnut. A good, firm connection will do just fine. Then, give it the good old test start. If your car hums to life with a happy purr, you’ve nailed it. If not, well, it might be high time to troubleshoot or get a professional’s eyes on it.
Safety Checks and Testing
After you’ve got everything hooked back up, don’t just jump in and take off. Do a couple of safety checks first. Turn on the headlights, honk the horn, check the radio – make sure all is working as it should. It’s like checking your pockets before you leave the house. Nobody wants to get halfway to work and realize they forgot their wallet.
If everything checks out, give your car a spin around the block. Pay attention to how it feels, and listen for any odd sounds. If it all feels good, you’ve just aced Battery Maintenance 101. If something’s off, it doesn’t hurt to double-check your work or consult with someone who knows their way around a car battery better than I can navigate a grocery store.
Additional Tips and Warnings
Start by disconnecting the battery, always removing the negative cable first to prevent accidental short circuits. Once removed, inspect the terminals for corrosion or buildup.
A simple and effective method is using the how to clean battery terminals with baking soda technique. Mix baking soda with a small amount of water to form a paste, apply it to the terminals, and gently scrub with a brush until the corrosion is gone. Always wear gloves and eye protection during the process, and make sure the terminals are completely dry before reconnecting the battery. Avoid over-tightening the cables, as it can damage the terminals and cause poor electrical connections.
When it comes to keeping your battery in top shape, here are a few extra nuggets of wisdom. Don’t let your battery sit idle for too long. It’s like letting a good joke go unheard. Drive your car regularly to keep the battery charged and happy. And always, always keep those jumper cables handy. They’re like the Swiss army knife of car tools.
Also, a word to the wise, don’t mix old and new batteries in devices. It causes imbalance like eating a steak with chopsticks. And if you see any signs of battery leakage, handle with care. That stuff is nastier than last week’s leftover fish. Better safe than sorry, as they say.
Tips for Prolonged Battery Life
If you want your battery to stick around longer than my teenage son’s attention span, consider a few parting tips. Keep your battery clean and terminals tight, just like your relationship with good habits. Avoid exposing your battery to extreme temperatures – batteries are not fans of sunbathing or snowball fights.
And remember, regular checks are your best friend. It’s easier to prevent a problem than to fix one, kind of like keeping your room clean so you don’t have to do a major cleanup every time someone’s coming over. Treat your battery right, and it’ll return the favor, keeping you powered up for the road ahead.
Warnings to Avoid Damage or Injury
When rolling up the sleeves and diving into the nitty-gritty of cleaning battery terminals, let’s keep it straight: safety isn’t just a fancy word. Batteries can pack a punch with their acid and electricity. So, before you start, eye protection and gloves aren’t optional—they’re your best friends. Mixing water and electricity is a big no-no, so make sure the battery and your hands are dry to avoid any shocking experiences.
Also, keep your workspace well-ventilated. Battery gunk isn’t perfume, and inhaling it could mess with your day, big time. And remember, just like not everything in the fridge is for snacking, not all cleaners are for batteries. Stick to what’s recommended, or you might turn a small cleanup into a big oops. After all, we’re aiming for a clean battery, not a science experiment gone wrong.
Seeking Professional Help
there are times when seeking professional assistance is the safest choice—especially if you’re dealing with severe corrosion, damaged cables, or complex electrical systems. An expert can inspect the battery’s condition, ensure proper disconnection and reconnection, and apply the right cleaning methods without risking harm to you or your vehicle.
For example, if you’re unsure how to clean battery terminals in a car without damaging sensitive electronics, a certified mechanic can perform the task efficiently while also checking the alternator, wiring, and battery health. This not only restores reliable electrical performance but also prevents future issues caused by poor connections or hidden corrosion.
There comes a time when even the bravest DIY warriors need to hang up their gloves and call in the cavalry. If you’re staring at a battery more crusty than a forgotten sandwich or your DIY efforts have turned your battery situation from bad to “what the heck happened here?”, it’s pros time. Those folks at the battery shops have seen it all and can tackle your battery woes with their eyes closed (figuratively speaking).
And hey, let’s be real. Not everyone’s got the time to play battery detective or the patience for a chemical cooking session with baking soda. Whether it’s because the corrosion’s got a stronghold or you’re just not up for the task, lean on a professional. It could save you time, money, and the hassle of explaining why your garage now looks like a scene from a sci-fi movie gone wrong.
When to Call a Professional
Now, when do you dial those pros? If peering into your engine bay leaves you puzzled or your battery looks like it’s been through a battle and lost, it’s time. Corrosion can be a sneaky beast, creeping into nooks and crannies, playing havoc with your connections. When your DIY cleaning turns into a whack-a-mole game with corrosion popping up faster than you can say “baking soda,” wave that white flag.
Maybe your ride’s been acting up, starting with more reluctance than a teenager asked to clean their room? That’s your cue. Those pros aren’t just good with a wrench; they’re like detectives for your battery’s mystery ailments. Plus, they’ve got the tools and know-how to fix things up without turning your car’s battery area into a DIY disaster zone.
Recommended Services for Battery Maintenance
If your battery’s starting to show its age, looking more like an artifact than a power source, consider hooking it up with some TLC at a trusted shop. Places that specialize in batteries often offer maintenance services that can help extend your battery’s life span, saving you from the early expense of a replacement. They’ve got the gear and the expertise to spot issues you might miss.
And don’t forget, regular checks can ward off bigger troubles down the road. It’s like going to the dentist for a checkup; a little poking and prodding now can save you a world of hurt later. So, look out for services that offer thorough cleaning, testing, and even a battery health report. It’s like giving your car a spa day, and who wouldn’t want that?
Your Questions Answered
Got questions? You’re not alone. The world of batteries can be as mysterious as why socks vanish in the dryer. Whether you’re scratching your head about how to keep your battery in tip-top shape or pondering the mysteries of battery corrosion, there’s a space to toss those questions into the ring and get some solid answers.
Luckily, the internet’s a treasure trove of wisdom with forums and Stack Exchange platforms brimming with folks who’ve been in your shoes. It’s like having a battery guru at your fingertips 24/7. No query too big or small, these communities are all about sharing knowledge faster than you can type “help me with my battery”.
Community Q&A
Now, the Community Q&A section is where the magic happens. It’s like a town hall meeting, but for battery problems. You toss your question into the mix and watch as answers roll in from folks who’ve navigated the stormy seas of battery maintenance. It’s a place where “there are no stupid questions” is the true motto, and sharing is caring.
Whether you’re in a pickle with a car battery that refuses to cooperate or wondering about the best ways to keep your household batteries going strong, this is your spot. You get practical advice, life hacks, and sometimes even a good chuckle. It’s all about community spirit, helping each other out, and learning something new every day.
Expert Answers to Common Questions
Oh, and for those times when you’re looking for something a bit more concrete, the Expert Answers segment is your go-to. Picture this: you’ve got a question about battery corrosion, and boom, an answer pops up that’s as satisfying as finding the last piece of a puzzle. These aren’t just any answers; they’re backed by the know-how of folks who eat, sleep, and breathe batteries.
It’s like having your own personal battery guru, minus the incense and chanting. Whether you’re dealing with the intricacies of Pascal’s Triangle in battery design or just trying to figure out why your car won’t start on a cold morning, there’s an expert answer waiting for you. It cuts through the noise, giving you straight-up facts and solutions without the fluff.
Final Thoughts: Maintaining Clean Battery Terminals
Maintaining those battery terminals might seem like a small part of the big engine puzzle, but let me tell you, it’s more like the silent hero of car stories. Just like you wouldn’t skip brushing your teeth to avoid a trip to the dentist, keeping those terminals clean is your ticket to smooth rides. You’ve got tools like baking soda, water, and even coca cola, alongside a brush or cloth, making it a cinch to scrub away the grime. And don’t forget, eye protection isn’t just a suggestion; it’s like the armor in this noble quest against corrosion.
After you’ve cleared the battlefield of corrosion with your chosen cleaning method, give the battery and its realm – I mean compartment – a good rinse and let it all dry before putting everything back together. Throw on some petroleum jelly on those terminals, not for beauty’s sake but to ward off future corrosion attacks. And remember, the steps you take today could save you from being stranded tomorrow. Keep those terminals clean, and your battery will keep you moving, proving it’s not just about the destination; it’s also about the care you put into the journey.